写真アプリとimovieを使用してiPhoneでマスタービデオ編集。
<伝説>キーテイクアウト
- iPhoneとiPadの写真アプリは、トリミング、トリミング、フィルターの追加などの重要なビデオ編集機能を提供しています。
- より高度なビデオ編集については、iMovieを使用すると、クリップをマージしたり、テキスト、音楽、移行などを追加したりできます。
- これらの組み込みツールはすべて無料で使用でき、初心者から経験豊富なユーザーまで、すべてのスキルレベルでビデオ編集がアクセス可能です。
iPhoneとiPadの写真アプリには、トリム、クロップ、色、スピードコントロール、ノイズリダクションなどが驚くほど有能なビデオエディターが詰め込まれています。クイックタッチアップまたはより深い編集、すべてデバイス上、追加のアプリ、エクスポートシャッフルなし。したがって、マイナーから複雑なものまで、あらゆる種類の編集をiPhoneで達成できます。このガイドでは、写真アプリとiMovieを使用してiPhoneでビデオを編集する方法を紹介します。
写真アプリを使用してiPhoneでビデオを編集する方法
写真アプリは、最近のiOSまたはiPadosバージョンの有能なエディターです。一部のオプションは、モデルとOSによって異なります。以下にこれらのケースに注目しました。
ビデオをトリミング
ビデオのトリミングと分割は、最も基本的でありながら便利な編集ツールです。クリップの不要な部分を削除し、ビデオの長さを短くすることができます。
- 写真を起動し、編集するビデオを開きます。
- 下の編集ボタンをタップします。
- 下部にビデオタイムラインが表示されます。どちらかまたは両方の端をドラッグ(<>)ビデオをトリミングします。ハンドル内の部分は残り、残りは削除されます。
- 三角形の再生ボタンをタップ適切なトリムを作成したことを確認します。必要に応じてハンドルを再度調整できます。
- done をタップし、ビデオを保存しますまたは新しいクリップとして保存
保存ビデオオプションは、元のファイルを上書きし、トリミングされたバージョンのみを保存します。トリムを元に戻したい場合は、ビデオを元の状態に戻すことができます。これについては、投稿の後半で説明します。
2。ビデオを収穫、フリップ、回転、まっすぐにします
時々、あなたのビデオがその方向、角度、またはフレームを調整する必要があるかもしれません。トリミング、フリッピング、回転、または矯正であろうと、 photos app
最初に、iPhoneでビデオをトリミングする方法を見てみましょう:
- 写真を開きビデオを選択し、編集。
- ツールバーからクロップを選択して、作物ツールにアクセスします。 4つのエッジのいずれかをドラッグして、ビデオをトリミングします。角からドラッグすることもできます。必要に応じて、2本の指を使用してズームインとアウトします。
- スクエア、長方形、9:16、16:9、3:4などの事前に構築された作物オプションを使用することもできます。
- 最後に、ビデオを保存するには done をタップします。
間違った方向で誤ってキャプチャした場合、ビデオをすばやく変更できます。 iPhoneでビデオを回転させる方法は次のとおりです
- crop ツールから、左上隅に矢印で四角いアイコンをタップします。
- 同じアイコンを数回タップして、目的の回転を取得します。
- ビデオを保存するために done をヒットします。
写真アプリを使用すると、90度の倍数でビデオを回転させることもできます(以下に示すように)。 2つの semi-circlesアイコンをタップし、スライダーを左または右にドラッグして、必要に応じてビデオを回転させます。これは、ビデオの角を大幅に切り取る可能性があります。
次に、ビデオをひっくり返してミラーリングされた録音を修正したり、逆の視点効果を作成したりできます。この編集では、左が右になり、右が左になります。そのために、左上にある 2つの三角形のアイコンをタップします。
最後に、ビデオフレームを伸ばすことができます。ニーズに応じて台形アイコンのいずれかを選択し、スライダーをドラッグします。中央のものはビデオを垂直に伸ばし、最後のものは水平に伸びています。 done をタップして、ビデオを保存します。
ビデオにフィルターを追加します
画像にフィルターを適用するのと同じように、ビデオでも同じことができます。これにより、ビデオの気分と美学を完全に変えることができます。写真アプリ:
を使用してそれらを適用する方法は次のとおりです
- iPhone 写真アプリでビデオを開き、編集アイコンをタップ。
- フィルター(3つの重複する円のアイコン)を下部にタップします。
- vivid> vivid>、ドラマチック>、 mono 、 noir などの使用可能なフィルターをスワイプします。
- フィルターを選択した後、その強度をその下のスライダーで調整します。スライダーの左をドラッグすると効果が低下し、右にドラッグすると増加します。
- ビデオを再生して、フィルターの動きを確認します。
- 満足したら、 done をタップして、適用されたフィルターでビデオを保存します。
フィルターは、ビデオの全体的な外観を強化する簡単な方法であり、より活気に満ちた、劇的な、またはスタイリッシュになります。さまざまなフィルターを試して、コンテンツにぴったりのマッチを見つける
ビデオの色、明るさ、その他の視覚効果を変更します
プリセットフィルターで希望の視覚的な外観を取得するたびにそうではありません。このような状況では、ビデオの色と明るさを手動で調整できます。
- 写真を起動してビデオを選択し、編集アイコン。
- 利用可能なツールから、調整(ダイヤル型アイコン)を選択します。
- ここで、次のコントロールがあります。
- auto
- 露出
- ハイライト
- 影
- コントラスト
- 明るさ
- ブラックポイント
- 飽和
- vibrance
- 暖かさ
- 色合い
- シャープネス
- 定義
- ノイズリダクション
- vignette
- auto をタップして、iPhoneに魔法をかけるようにします。
- 他のオプションをタップし、スライダーを左または右にドラッグして調整します。編集の望ましいレベルを実現するために、複数のオプションを試してください。
- 最後に、ビデオを保存するには done をタップします。
をタップします
これらの設定を微調整することにより、ビデオの品質を大幅に向上させ、視覚的に魅力的にすることができます。
ビデオ再生速度を調整します
写真エディターのサポートされているデバイスの再生速度を調整できます。 SLO-MOの場合、クリップがより高いフレームレートで記録されていることを確認してください。ビデオは、30fpsを超えるフレームレートでキャプチャする必要があります。ビデオの再生速度を調整する方法は次のとおりです
- ビデオ編集画面で、右上隅にある速度制御アイコンをタップします。
- ドロップダウンメニューから再生速度を選択します。
- ビデオを再生して編集を確認し、 done 。
それは、通常のビデオをスローモーションに変換する方法です。次に、iPhoneでSLO-MOビデオを編集する方法を理解しましょう。
Slo-Moビデオをカスタマイズ
ビデオでSLO-MO効果を改良すると、特定の瞬間を強調できます。この機能により、SLO-MO効果が始まり、終了する場所を正確に制御できます。
- ビデオの編集メニューに移動し、速度制御ボタンをタップ。
- slo-mo セクションは、タイムラインの下で強調表示されます。
- 最長の垂直バーをドラッグして、SLO-MO効果の範囲を変更します。
- ビデオを再生して、調整されたSLO-MOセクションがどのように見えるかを確認します。
- 満足したら、タップ done 。
ビデオからサウンドを削除します
ビデオからサウンドを削除すると、不要なバックグラウンドノイズが排除されます。これらの手順に従って、写真アプリでビデオをミュートします:
- 写真アプリでビデオを開き、編集アイコンをタップ。
- 左上にあるスピーカーアイコンをタップします。スピーカーを消します。
- done をオーディオなしで保存してください。
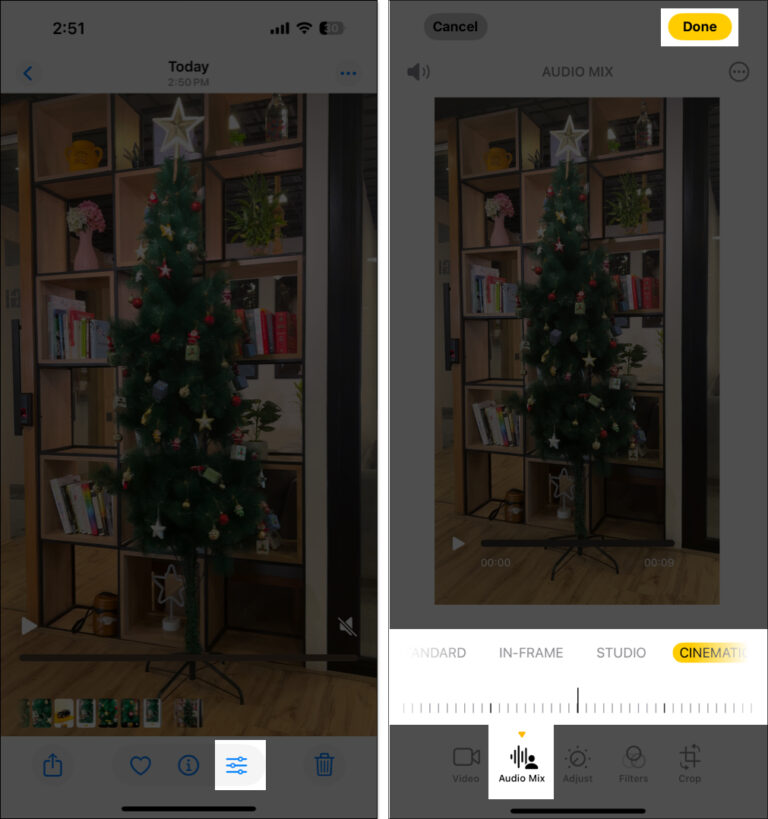
編集オーディオミックス
最新のiPhone 16シリーズには、Audio Mixと呼ばれる高度なカメラ機能があります。これにより、より没入型のエクスペリエンスを得るために、Spatial Audioでビデオをキャプチャできます。後で、さまざまなモードを使用してビデオサウンドを編集して、バックグラウンドノイズを削除し、フレーム内の声にもっと集中できます。
すべてのiPhone 16モデルには、デフォルトで空間オーディオがオンになっているため、録画する各ビデオが周囲をキャプチャします。 iPhoneのオーディオミックスでビデオサウンドとボーカルを編集するには、以下の手順に従ってください。
- 写真でビデオを開きアプリをタップし、編集アイコン。
- オーディオミックスをタップオプション。
- さて、次のモードが表示されます。
- 標準:録画した実際のオーディオを保持します。
- in-frame:ビデオフレームには見えないソースからオーディオを削減します。だから、ビデオで話している人ははっきりと聞くことができます。
- Studio: It modifies the voices like studio recording, eliminating background noises.
- Cinematic: If you want your video to sound like a film, select this. It focuses on the vocals in the video frame while leaving environmental sounds in the surroundings.
- Choose an effect you prefer and drag the intensity slider to adjust it.
- Once satisfied, tap Done.

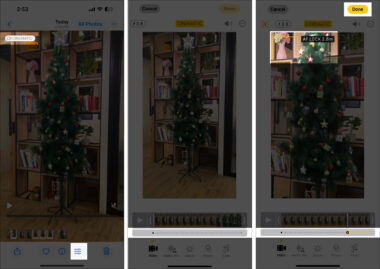
Edit Cinematic mode videos
Cinematic mode on the iPhone enables you to focus on a subject while blurring the background like high-end cameras. You can edit various aspects of Cinematic mode videos, such as adjusting focus points and changing depth-of-field intensity.
Depth-of-field intensity: Adjust the amount of background blur.
First, let’s see how to change the focus subject in the Cinematic mode video.
- Launch the Photos app and locate your Cinematic video. Tap on it to open.
- Select the edit icon below.
- You will see white dots under the video timeline where your camera automatically shift the focus. Play the video and pause on the frame where you want to change the focus.
- Now, tap the subject to shift focus on it. If you want to continue the focus on the subject, double-tap on it.
- To lock the focus at a specific distance, tap and hold the screen.
- You can repeat the process through the video timeline to adjust focus for different frames.
- Hit Done to save the edited video.

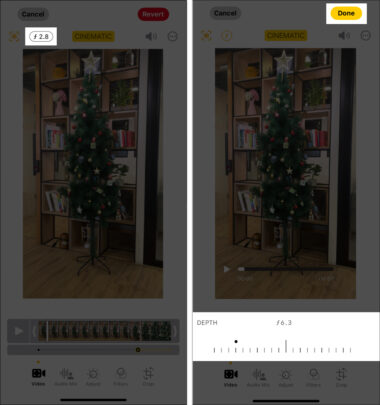
Next, you can modify the depth of field intensity in your Cinematic mode video.
- Go to the video editing screen and tap the f icon at the top.
- Below the video, you will see a depth slider. Drag the slider to increase or decrease the background blur.
- Preview the changes and tap Done.

Apply copy edits in bulk to videos
The Photos app also lets you batch-edit your videos to save time and maintain consistency. You can simply copy edits from one video and apply them to multiple others.
Therefore, to use the feature, you need to edit a video first for reference. Then follow the steps below:
- Open the Photos app and select the video you have already edited.
- Tap the three-dot menu at the top right corner and select Copy Edits.
- Ensure the Adjust toggle in enabled and tap Copy. This copies all the adjustments you’ve made, including filters, color tweaks, and other visual effects.
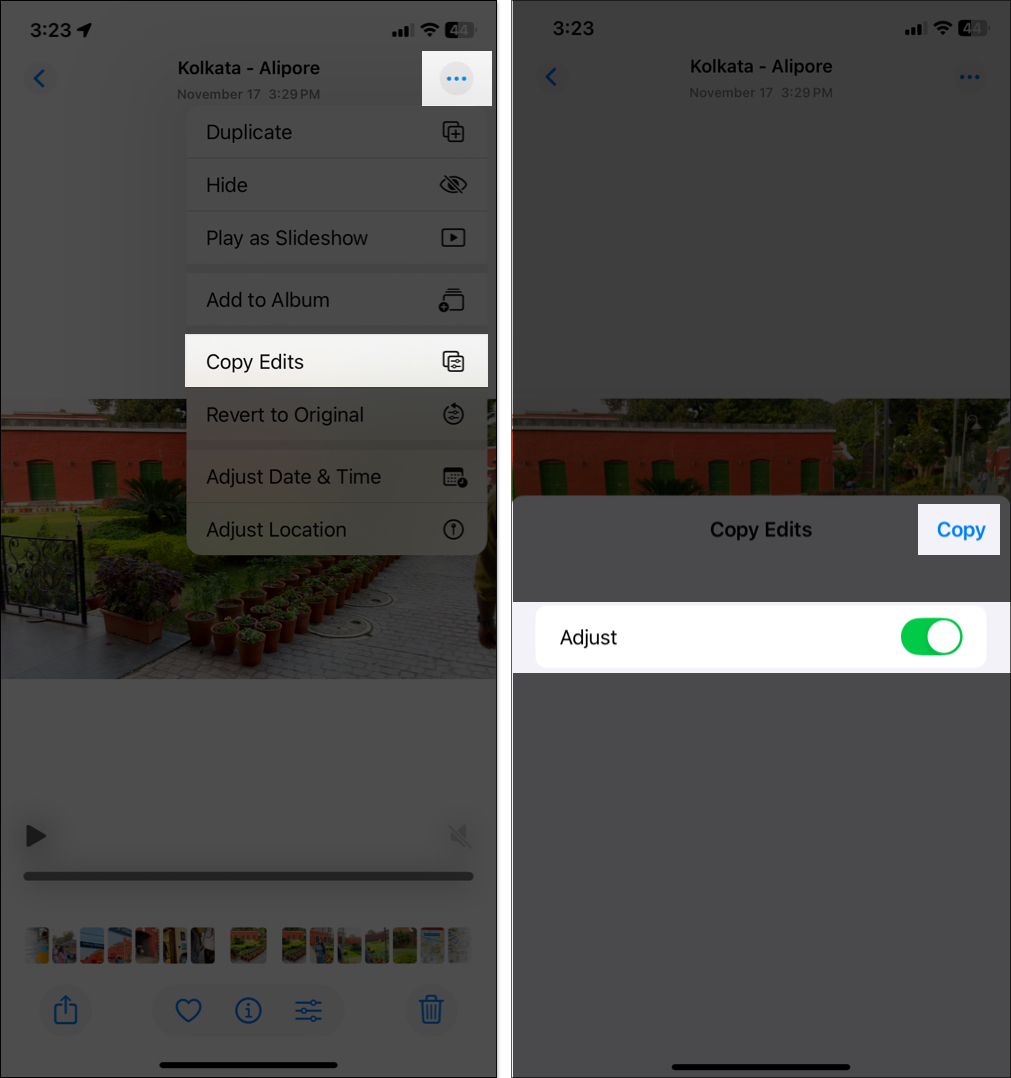
- Now, go back to your library and tap Select. Choose the videos you want to edit.
- Tap the three-dot menu at the bottom right corner and select Paste Edits.
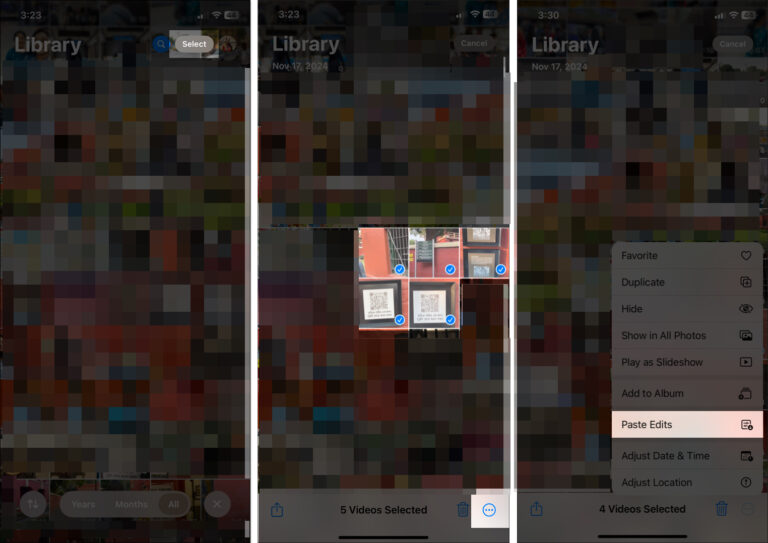


The copied adjustments will be instantly applied in bulk to all the selected videos. You can play them to ensure they look as intended. If a specific video requires additional changes, you can edit it individually without affecting others.
Moreover, if you want to paste edit only to one video, open it, tap the three-dot menu at the top, and select Paste Edits.
Next, comes the most important steps for editing videos on an iPhone.
Revert a video to its original state
If you’ve made edits to a video but want to go back to its unaltered version, it’s easy to revert a video to its original state in Photos if you change your mind. Here’s how you can do it:
- Launch the Photos app, open the video you’ve edited, and tap the edit icon.
- Select the red Revert option at the top right corner of the screen.
- Confirm your choice by tapping Revert to Original. The video will instantly return to its original state, discarding all the previous edits.
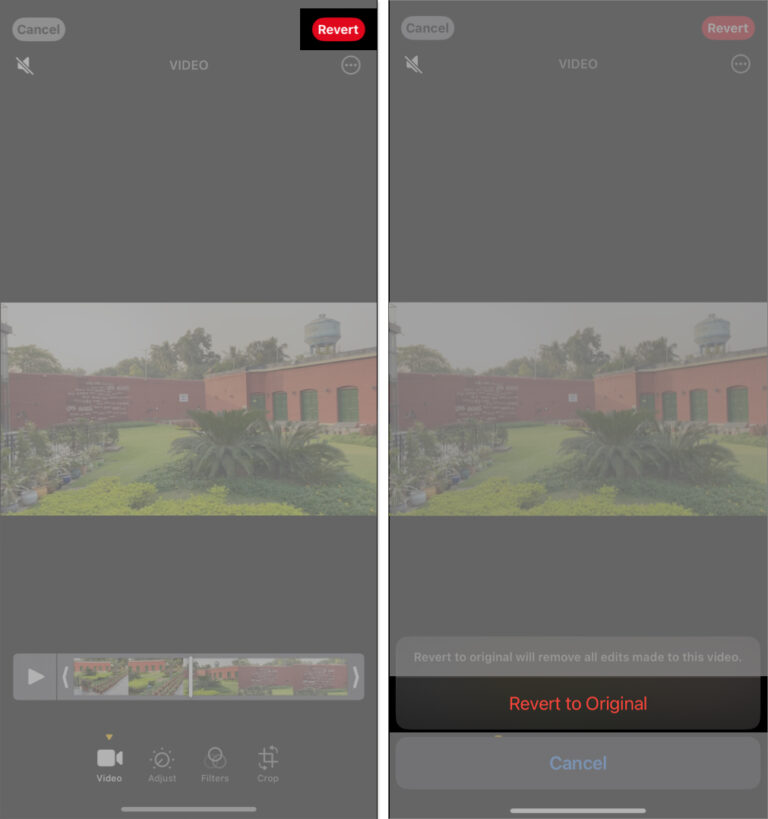

Once you confirm, the video is automatically saved. It will now appear exactly as it was before any edits were made. However, note that if you have saved a video as a new clip after trimming, it will not undo the trimming.
You can only do basic editing with your videos in the native Photos app. If you want more advanced editing, you need Apple’s iMovie app. In the next section, I will discuss some editing methods in iMovie.
How to add text, merge clips, and add music to videos on iPhone with iMovie
Before you start the steps, download and set up iMovie from the App Store. It’s free to use.
Add text in a video
Adding text to your video can help convey a message, emphasize key moments, or provide context. Here’s how to do:
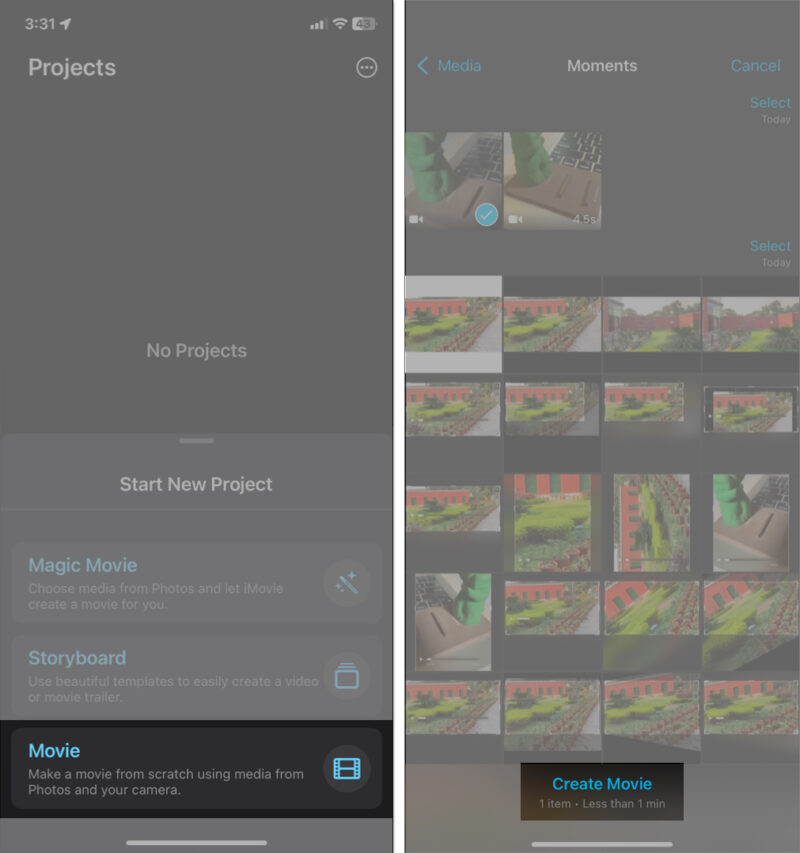
- Launch iMovie and tap Movie.
- Select a video and tap Create Movie.
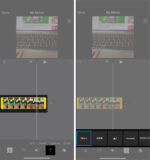
- Hit the video timeline to reveal the editing tools.
- Tap T from the bottom toolbar.
- Choose a text style like Slide, Split, Chromatic, etc.
- You will see TITLE TEXT HERE on the video. Tap it and choose Edit.
- Now, type the desired text and tap Done on the keyboard.
- To change the text position, drag the text around.
- Next, you can customize the text:
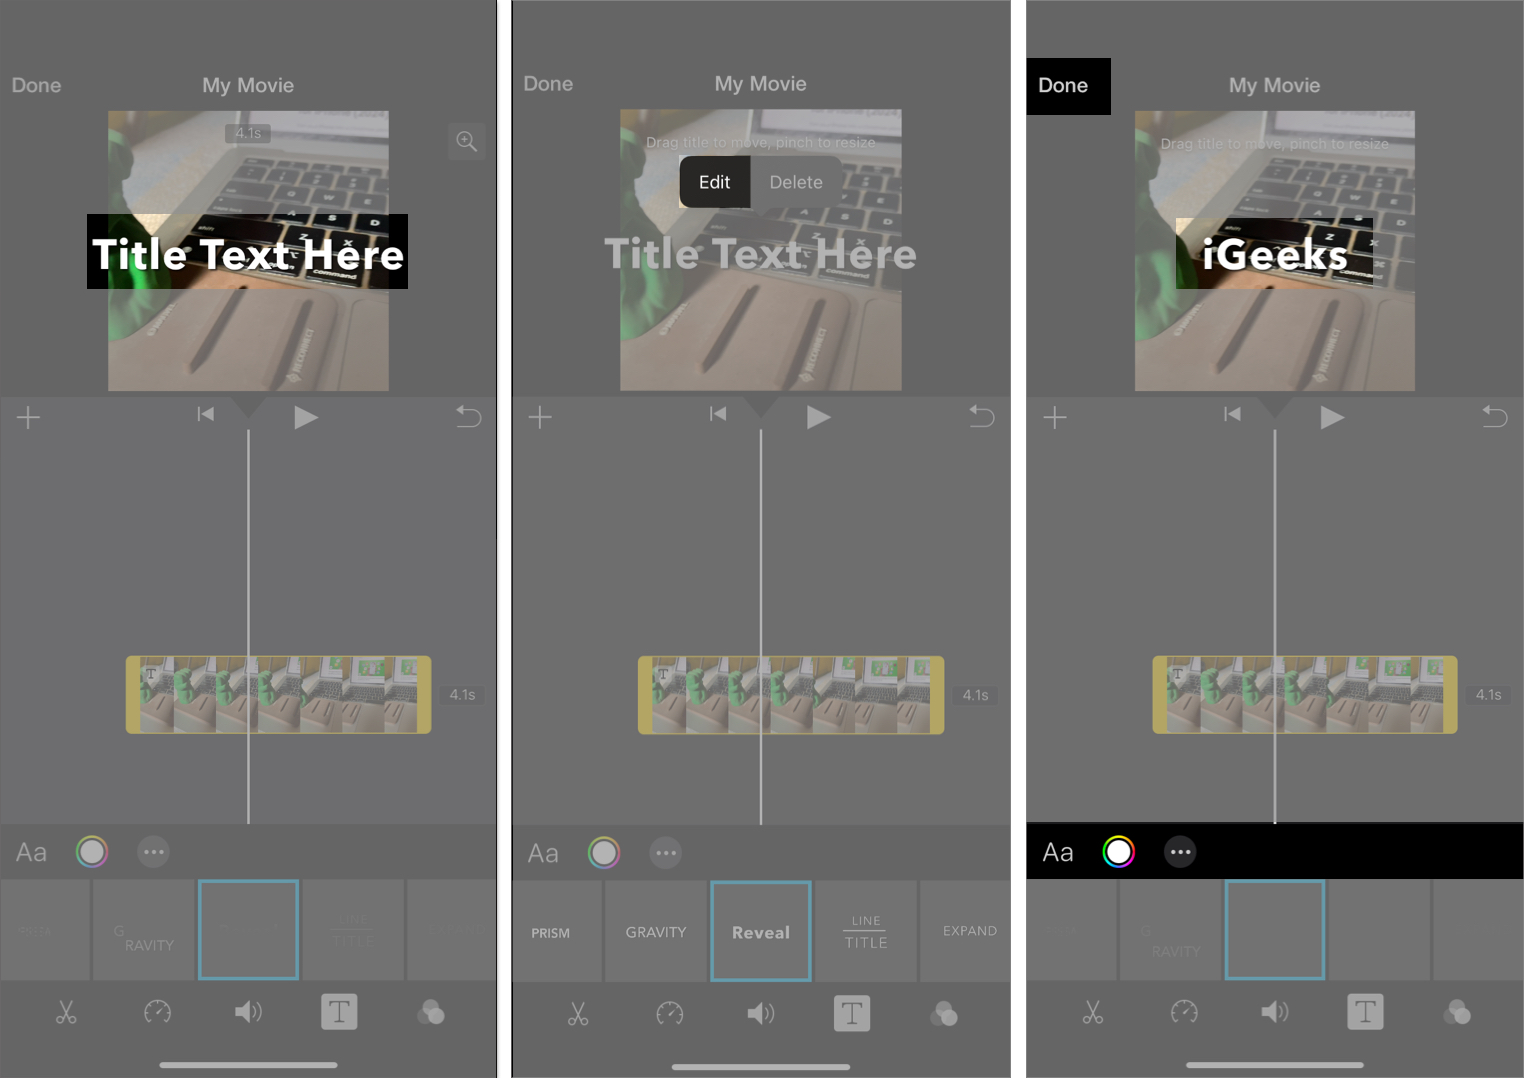
- Tap Aa to choose another font.
- Tap the color wheel icon to set the text color.
- Hit the three-dots icon to style the text.
- Enable Full Clip Duration if you want the text to stay on the video in its entirety.
- If you want to remove all the styling, tap the customized text from the video preview and select Reset.
- Tap the triangle play button to preview the video.
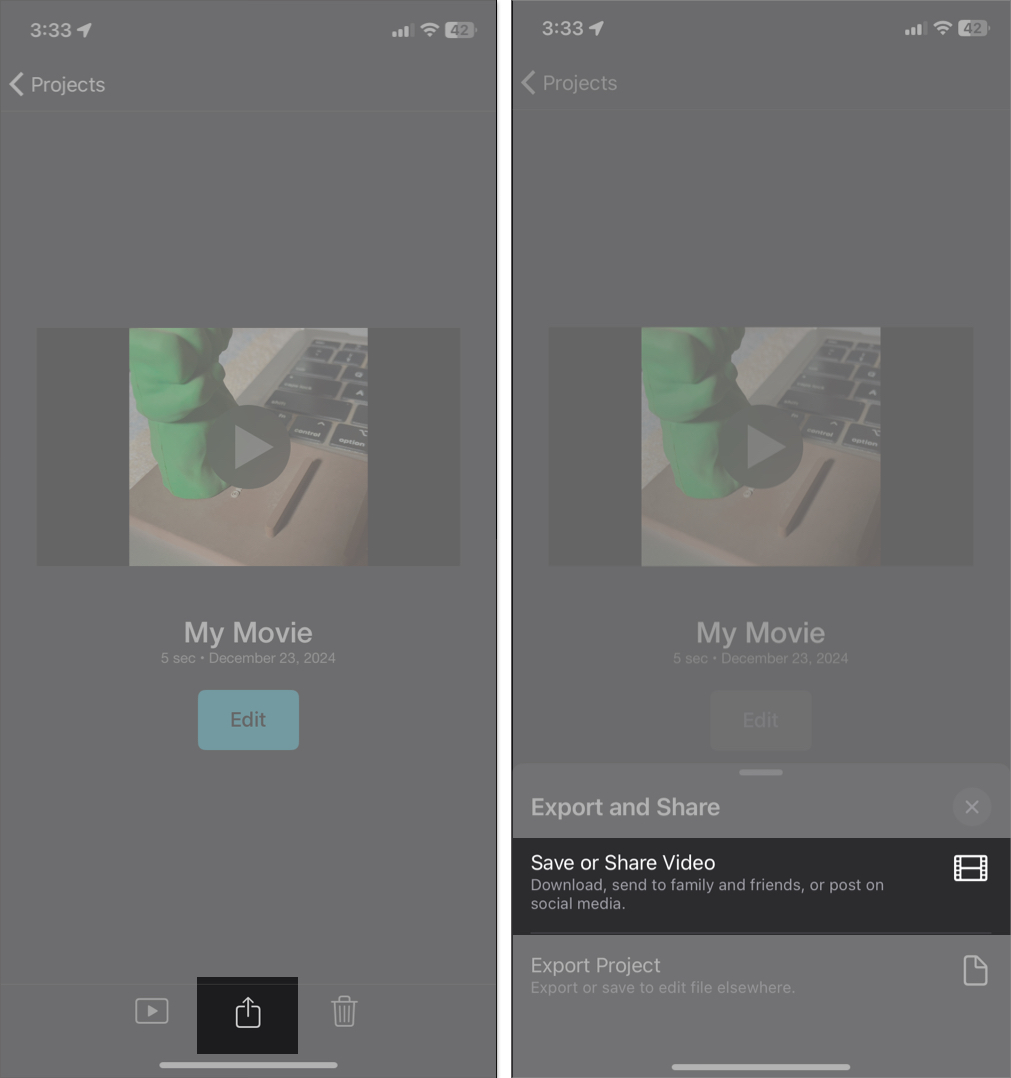
- Once satisfied, tap the Done → Share icon and select Save or Share Video.


Combine two or more videos together
iMovie lets you merge video clips quickly on iPhone and apply beautiful transitions for a seamless effect.
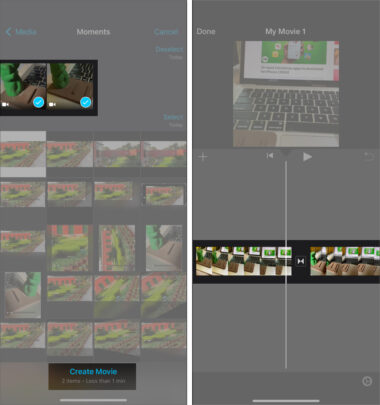
- Open iMovie and tap Movie.
- Tap to select two or more videos.
- Or, tap < Media from the top left and hit Video to see all clips.
- Tip: If you rotate your iPhone into landscape orientation, you will automatically see the media types like Video, Albums, etc. Next, tap a video and then tap the check box.
- After selecting the videos, tap Create Movie.
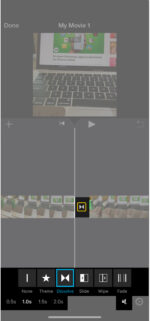
- The selected videos will automatically be added to the timeline one after another. If you like the video order, jump to step 6. If you do not, touch and hold one of the videos and drag it all the way to the left or right to change the order.
- Transition effects: You will see a tiny icon made of two triangles between two videos. This symbolizes the transition effect.
- Tap it and choose None if you want no effect when one video ends and the other one begins. You may choose one of the other transition effects like Theme, Dissolve, Slide, Wipe, and Fade.
- To turn off the transition sound, tap the speaker icon.
- Use 0.5s, 1.0s, 1.5s, or 2.0s to set the length of the transition effect.
- Now, tap the triangle play button to preview the final video.
- Once satisfied, tap Done at the top left.
- Now, tap the Share icon and tap Save or Share Video to get the merged video in the iPhone Photos app. You may also share the merged video directly using AirDrop or other apps from the Share sheet.


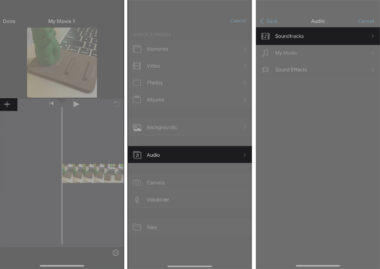
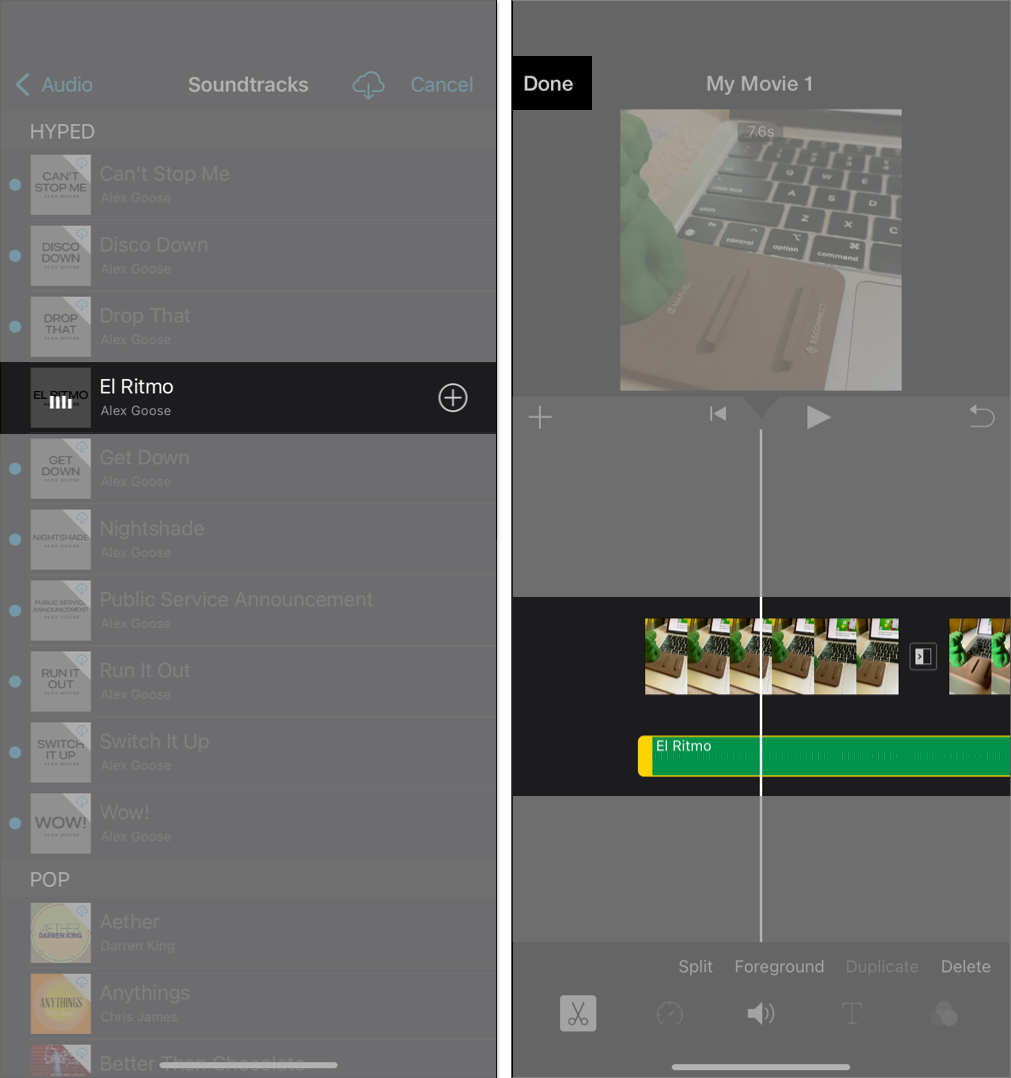
Add music to video
You can use iMovie or other third-party apps to add music and songs to your videos.
- Launch iMovie, tap Movie, select a video, and tap Create Movie.
- Tap the plus icon and select Audio.
- Choose Soundtracks to get popular music.
- Select a song and tap the plus icon beside it.
- Now, tap the audio timeline to edit it.
- Once satisfied, tap Done.


Signing off…
Editing videos on your iPhone and iPad has never been easier. The Photos app offers a wide range of powerful tools, and beginner-friendly apps like iMovie allow you to create stunning videos directly from your device.
I hope this guide was helpful. If you have any additional questions, please ask via the comments section below.
Check out next: